This post may contain affiliate links. This means we may receive a commission (at no cost to you) if you click a link and make a purchase.
When planning our two week Utah National Parks trip, Mike and I were really planning on doing one thing— hiking. Since Zion was our first stop of the tour, we were fresh off the plane and ready to roll. After flying into Las Vegas, we spent three days exploring some of the best trails that Zion has to offer.
Note: Several trails such as Weeping Rock and Hidden Canyon are currently closed due to rockslide and were not open during our trip (November 2019). Check the Zion National Park website to learn about trail closures or stop at the Visitor Center to learn more.
Day 1: Arrive at Zion, Watchman Trail, Zion Canyon Overlook Trail
Watchman Trail

- Shuttle Stop: 1 Visitor Center
- Distance: 3.3 miles round trip
- Elevation Gain: 368ft
- Difficulty: Moderate
- Trail Markings: Good
The Watchman overlooks Zion National Park’s Springdale entrance, towering over you upon your arrival to the park. The Watchman Trail is a perfect start to your trip to Zion since the trailhead is right near the visitor center and gets your lungs adjusted to the altitude on a shorter trail before tackling one of the longer and more difficult trails like Angel’s Landing. Since it took us a few hours to drive to Zion from Vegas, we didn’t arrive until around lunch time. Even so, this trail was much less crowded than many others and made for some spectacular views of parts of Zion Canyon.
Pro Tip: Grab one of the Zion National Park Information Sheets from the Visitor Center as it has a lot of the information mentioned here on all the hiking trails.
Zion Canyon Overlook
If you’re looking for another short trail in the late afternoon, try the Zion Canyon Overlook. I regret that we weren’t able to get to this overlook on our trip, but it will definitely be on our list of stops in Zion next time around. You do need to take a car to get up to the trailhead through the east side tunnel which has very limited parking, but the views are said to be absolutely spectacular for a short 1 mile hike.
If you’re staying right in Springdale, it may be worth saving this for the morning / sunrise on Day 3 before heading to Kolob Canyons, but since we were staying all the way out in La Verkin, UT it made more sense to head straight to Kolob that morning.
Other Day 1 Options: Pa’rus Trail and Archaeology Trail
In addition to the Watchman Trail, depending on how much time you have in the day, you could also choose to check out some of the other easy trails near the Visitor Center. The two other options are the paved Pa’rus trail that runs along the river and the short but steep Archaeology Trail. As its name suggests, the Archaeology Trail starts from the Visitor Center and climbs to a few prehistoric buildings in just a half mile round trip. The Pa’rus trail is longer but you can choose just to walk a portion of the trail before heading into Springdale for a bite to eat and an end to your first day in Zion. Be sure to get plenty of sleep as you’ll be up early tomorrow for Zion’s main attractions!
Day 2: Angel’s Landing, Zion Riverside Walk to Narrows, Upper Emerald Pools
Day 2 packs in the majority of the hiking and the most popular trails including the famed Angel’s Landing and/or the Zion Narrows. We chose to get up early in the morning and catch the first shuttle bus to the Grotto a 7am to tackle Angel’s Landing.
Angel’s Landing

- Shuttle Stop: 6 The Grotto
- Distance: 5.4 miles round trip (including chains section)
- Elevation Gain: 1488 ft
- Difficulty: Very strenuous
- Trail Markings: Excellent
If you’re planning a trip to Zion, chances are you already know about Angel’s Landing, one of the most dangerous hikes in the United States. Since Mike and I are not the best with heights, we had tested ourselves on some less strenuous options like Precipice Trail and Beehive Trail in Acadia National Park a few months prior to this trip. Let me be the first to say though that nothing can truly prepare you for this hike. Between the relentless switchbacks, spectacular views of Zion Canyon, and dizzying heights, Angel’s Landing is not for everyone. I thought I was relatively in shape but the first set of switchbacks below were rough to say the least. I had to stop multiple times to catch my breath. The second ones, affectionately termed Walter’s Wiggles, aren’t a picnic either.
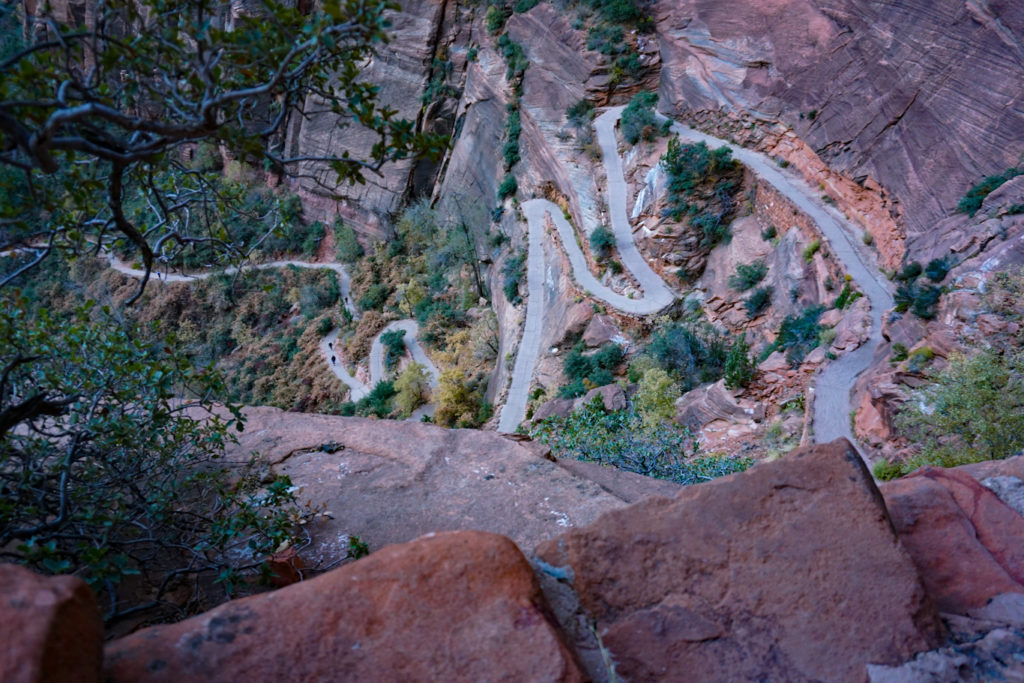
Even if you don’t have a fear of heights, the final half mile through the chains section is unnerving to say the least. We actually chose to stop after the first section of chains at the clearing below, and didn’t make our way up the spine to the top of the landing. Tackling a bit of the chains was enough for us to say we did it, and I imagine most people do the final bit of trail more for the adrenaline rush than for the incrementally better views than the one we had from this landing. Once we stopped at this landing for a snack we made great friends with the chipmunks begging for food. It’s best not to feed the animals so they don’t become dependent on humans for food, but they were quite adorable!

Over the years several people have died on this hike, and there’s no shame in not making it all the way to the end. We knew going into the hike we may only choose to go to Scout’s Landing, the plateau prior to the chains sections. Just know your limits, wear the right footwear and take your time. I do recommend going early in the day like we did, especially if you plan on heading the whole way to the top as you’ll have to wait for people heading up or down the chains as its really only safe for one way traffic. Once you finish with the hike back down, take a bit of a break, grab a snack and prepare for the next part of your day.
Riverside Walk to Zion Narrows

- Shuttle Stop: 9 Temple of Sinawava
- Distance: 1 mile (+up to 8.4 miles along the Narrows)
- Elevation Gain: 334ft
- Difficulty: Easy- Difficult
- Trail Markings: Excellent
The Riverside Walk is a relatively flat trail that follows the Virgin River to where most visitors start their trek through the massively popular Zion Narrows. Once you reach the end of the path, your hike begins in the water itself, wading through in gaiters and other waterproof gear. Depending on how far you are planning to hike along the Narrows, this may be a place where you choose either Angel’s Landing or The Narrows to do on this day (with plenty of time in the evening to try to dry out your shoes). The nice thing is that there isn’t really a set trail and you can choose to wander downstream for as long as you like before returning the way you came. You may want to check the weather before starting off down The Narrows, however, since flash flooding can be very dangerous.
We chose not to hike the Narrows due to the cold water in November, but saw plenty of others making the trek. Even if you don’t plan to set foot in the water, the Riverside Walk is breathtaking and a great place for snapping photos. Such an accessible trail also means lots of crowds though, so be prepared to not have this beauty all to yourself.
Kayenta Trail to Emerald Pools

- Shuttle Stop: 6 The Grotto
- Distance: 2 miles
- Elevation Gain: 150ft
- Difficulty: Moderate
- Trail Markings: Good
The Kayenta Trail was one of our favorites of our visit to Zion, although I didn’t see it talked about much in other blogs as a must do. Most others suggest doing the Emerald Pool Trails, but this trail actually connects to those anyway. Due to some unfortunate rockfall, the Upper and Lower Emerald Pool Trails were closed, but we were still able to make it to the Upper Emerald Pool via this trail. The trailhead is the same as for Angel’s Landing, you just go left instead of right.
I personally found this trail much more about the journey than the destination. At least when were were there, I didn’t see anything too spectacular to look at once we arrived at the Emerald Pool but perhaps this varies throughout the year depending on the rainfall.
Day 3: Kolob Canyons
If you’re looking to escape some of the Zion crowds, head up to the Kolob Canyons region in the northwest section of the park. It’s about a 50 minute drive from the main entrance to Zion Canyon up I-15, so I recommend making this section of the park its own day or part of a day. We chose to make it our last day before driving to the next stage of our trip in Cedar City to check out Cedar Breaks National Monument.
This section of the park features a 5 mile scenic drive and 3 hikes to choose from ranging in distance from a short 1 mile hike to a 14 mile strenuous trail. Some of the trails also are limited to 12 people per group. The strenuous La Verkin Creek Trail is probably too much after yesterday’s amount of hiking, so I recommend starting with the shortest hike and then potentially adding on the 5 mile Taylor Creek Trail if you’re feeling ambitious.
Timber Creek Overlook Trail

- Shuttle Stop: N/A
- Distance: 1 mile
- Elevation Gain: 100ft
- Difficulty: Easy
- Trail Markings: Good
The Timber Creek Overlook Trail is the shortest of the three hikes in Kolob Canyons, but it was worth the short hike to some fantastic views. The trailhead sits at the end of the scenic drive, starting from the Kolob Canyons Viewpoint. We only saw a handful of other people on this hike (including a wonderful family who was nice enough to snap this picture of us).
Tips for Visiting Zion National Park
Before heading out on your trip to Zion, here are a few suggestions and things to watch out for.
- Shuttle System – Zion utilizes a shuttle system throughout much of the year to reduce congestion on the main road. There is also a shuttle that runs through downtown Springdale to the Visitor Center if you need to park outside of the park. If the shuttle is running, you won’t be allowed to drive down the Zion Canyon Scenic Drive in your own vehicle. We didn’t have a problem getting on and off the shuttle, but during busy season you could be spending a significant period of time waiting for the shuttle.
- Temperature Changes – We were here in the beginning of November, and while the mornings were quite chilly (40s), it warmed up quickly to around 70 degrees. Be prepared with lots of layers as you hike.
- Elevation – Zion isn’t the highest elevation of all the Utah National Parks, but it is quite higher than what Mike and I are used to in New York. I found that a lot of my strength training was fine but I was huffing and puffing up the side of Angel’s Landing, even after doing some training for it prior to our trip. Come prepared and give your body some time to adjust before tackling some of the more intense trails.
- Flash Flooding and Rain – The Virgin River may not seem like much during the dry season, but it can quickly overtake the road and can flood from rains much farther upstream. Take caution when planning to hike The Narrows or any of the more dangerous hikes with steep drop-offs like Angel’s Landing or Hidden Canyon Trail.
Are you planning a trip to Zion? Pin this post for later!

